Search another article?
Here a brief video that explain how to use it. Following all the concepts and features explained in details:
Table of Contents
ToggleIntroduction
Main concepts
The Incident Management SGBox module allows to manage Incidents sourcing from different systems and customers (SOC), through a single pane of glass, aggregating incoming Incidents in new entities called Issues.
Basically Incidents are events associated with an SGBox Class of type “Incident”.
Events generated by some specific features of SGBox such as LCE Rules or the Query system are associated with classes of type “Incident” by design, but it is also possible to define custom incident classes to meet all customer needs.
As the first incidents are generated, after configuring SGBox to produce the Incidents, the Incident Management module start working providing the personnel in charge with a tool to manage them centrally.
Issue Statuses
Each Issue can have, and can change, several statuses during his life depending by the evolution of the Issue itself.
There are 2 primary statuses, Open and Closed, followed by 5 secondary statuses and other 2 absolute statuses.
Primary Statuses
- Open – Set by the system when an Issue is created. Can also be set by a Supervisor when reopening a closed Issue.
- Closed – Closed Issue, can be set by either a Supervisor or an Operator. Closed Issues can be reopened, if needed, only by a Supervisor.
Secondary Statuses
- Unassigned – Set by the system when a problem is created. It can only be set by a Supervisor for Issues in Pending status.
- Assigned – Set by the system when an Issue is taken over by an Operator.
- Waiting – Set either by a Supervisor or an Operator in case responses from third parties are expected. Temporarily suspends the SLA and automatically expires after a configurable time interval.
- Pending – Set by the system, identify Issues assigned to someone but not yet taken in charge by an Operator
- Suspended – Can only be set, and possibly removed, by a supervisor. This state suspends the SLA until you manually unsuspend it.
Absolute Statuses
- SLA-Exceeded – Set by the system when the Take over SLA is exceeded. Once set it cannot be changed any more
- SLA-Exceeded2 – Set by the system when the Overall SLA exceeded. Once set it cannot be changed any more
Difference between Waiting and Suspended statuses
The Waiting status can be set either by a Supervisor or an Operator, to temporarily suspend the SLA, when in agreement with the customer there is the need to suspend the SLA, for example when the customer is asked a question, relating to the issue in progress, and the SOC cannot proceed until the answer is obtained.
The Waiting timeframe duration can be set through the Configuration panel in the Configuration Options section. The Waiting period expires automatically and the Issue is returned to his previous state.
The Suspend status can be set only by a Supervisor that needs to suspend the SLA, without any time limit, until the Issue is manually resumed by the same or another Supervisor.
Issue Categorization and Prioritization
The system provides what is necessary to manage Issues categorization and prioritization.
Categories
Incident categorization is the process of grouping incidents into categories based on their characteristics or properties. One common approach used in IT incident management is to classify incidents as False Positive, True Positive (benign), and True Positive (malicious).
- False Positive: Incidents that are incorrectly identified as security threats. These incidents are often caused by system or network errors, misconfigurations, or other benign factors. They are not a real threat and do not require any action.
- True Positive (benign): Incidents that are correctly identified as security threats but are not malicious in nature. These incidents are often caused by human error, software bugs, or other factors that do not pose a significant risk to the organization. They may require some action to be taken, such as patching or configuration changes, to prevent them from recurring in the future.
- True Positive (malicious): Incidents that are correctly identified as security threats and are caused by malicious actors. These incidents are often caused by hacking, malware, phishing, or other malicious activities. They are a real threat and require immediate action to be taken to mitigate the risk and prevent further damage.
Priorities
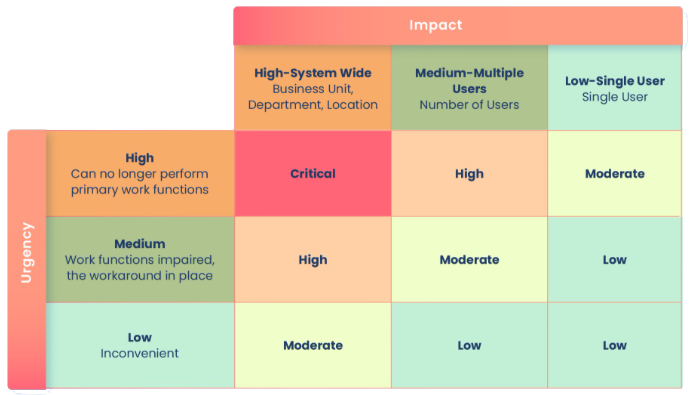
SGBox Incident Management implements a classic ITIL prioritization matrix, based on the urgency and the impact of an IssueIn the ITIL prioritization matrix, the impact of the incident is typically measured in terms of the number of users affected, the criticality of the service affected, and the financial impact on the business.
- Number of users affected: The number of users who are impacted by the incident is a key factor in determining the impact of the incident. Incidents that affect a large number of users will have a higher impact than incidents that affect a smaller number of users.
- Criticality of the service affected: The criticality of the service affected by the incident is also a key factor in determining the impact of the incident. Services that are critical to the business operations will have a higher impact than services that are less critical. For example, an incident affecting the company’s main website will have a higher impact than an incident affecting a non-critical internal application.
- Financial impact on the business: The financial impact of the incident on the business is also a key factor in determining the impact of the incident. Incidents that result in significant financial losses or revenue loss will have a higher impact than incidents that do not result in financial losses.
On the other hand, the urgency of the incident is typically measured in terms of the time required to resolve the incident and the potential for further damage if the incident is not resolved.
- Time required to resolve the incident: The time required to resolve the incident is a key factor in determining the urgency of the incident. Incidents that can be resolved quickly will have a lower urgency than incidents that will take longer to resolve.
- Potential for further damage: The potential for further damage if the incident is not resolved is also a key factor in determining the urgency of the incident. Incidents that have the potential to cause significant damage if not resolved quickly will have a higher urgency than incidents that have little potential for further damage.
By considering both the impact and urgency of an incident, IT teams can prioritize incidents that are most critical for the business operations and address them in a timely manner.
Authorization Levels:
The access to the SGBox Incident Management module, in compliance with the least-privilege and role-segregation rules, is regulated through four predefined levels of authorization that are bundled to the following users categories/types:
Special users
imadmin
Authorization level 0.
Is the IM module predefined administrator, and can only access and operate the IM Configuration.
admin
Authorization level 0.
Is the default SGBox Administrator and is also the first, predefined, IM Supervisor being part of the default Supervisors group by design.
It is possible to configure this user adding the capability to access and operate the IM configuration, as well as the imadmin user, from the configuration panel itself.
So, why we’ve to deal with two users that seams to have the same behavior? Simply because we need to find the smoothless balance between comply the regulations and the operational efficiency.
In medium to large and/or structured organization like SOC, enabling the SGBox admin user to act as the imadmin user is strongly discouraged as this is not compliant with GDPR or with local equivalent Data Protection Regulations. However, for small organization, this approach can be an easyer way to the Incident Management.
In principle, current Data Protection Regulations don’t allows the use of “generic” or “shared” accounts especially in the case of administrative users. This means that both the admin and the imadmin user needs to be individually assigned to specific person to respect both the “Role segregation” and “Least privilege” principles and the regulations. This will also allow to know who did what in case of an investigations or necessity.
Pratically, at the very first access, it is mandatory to use the imadmin user to perform the initial IM configuration.
Groups
Supervisor
Authorization level 0.
Supervisor is the highest operational authorization level.
Supervisors can fully manage Issues and can perform some role-specific actions as Assign/Unassign, Suspend/Resume, etc.
It is possible to have one or more Supervisors groups made up of one or more users.
Operator
Authorization levels 1, 2 and 3.
The operator authorization level is lower than the supervisor one and, in turn, is divided into 3 sub-levels which can be used to build a specific operating hierarchy.
The Issues life-cycle in brief
Broadly, after being properly configured the SGBox SIEM instance will start to analyze incoming events, raising Incidents when events will match defined rules; is at this point that the IM module become part of the game. So what’s happens?
- The IM backend aggregates incoming Incidents into Issues depending on the Incidents associated SGBox class
- New Issues are created by the system immediately after the first Incident has arrived.
- The SLA accounting starts now (if configured)
- If the Automatic Issues Assignment feature has been activated and configured, the system will assign Issues to the proper Users/Groups as for defined rules. Otherwise a Supervisor in charge will have to manually assign Issues to the proper Users/Groups
- Once an Issue has been assigned, it remains in Pending status until an Operator or a Supervisor takes charge of it.
- At this point it is assumed that someone, most likely an Operator, has taken charge of the Issue
- After an Issues has been accepted it will remain in an Open/Assigned status until the owner or a Supervisor closes it.
- The Owners can manage the life cycle of their Issues, adding comments, modifying the statuses, setting the category and/or the priority, and, if necessary, delegating the Issue management to other Operators.
- When all activities related to the Issue will be completed, the owner (or a Supervisor) will close the Issue.
How to: First Access
The IM module is distributed disabled to prevent, in case it is not used, the incidents generated from causing disk space saturation on the SGBox server. So it is necessary to enable the module beforehand before using it.
IM module can be enabled accessing to the IM Configuration panel.
Accessing the Configuration panel
To access the configuration panel select the IM -> Configuration menu option on the left-side menu.
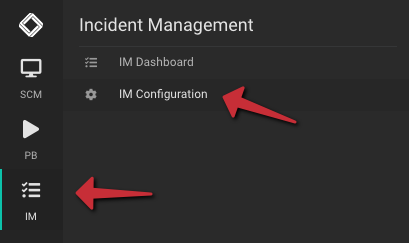
At the very first logon, also the admin user can access the Configuration panel to speed up initial configuration but, as explained in the Special Users paragraph under the Authorization Levels chapter, is strongly suggested to use the IM Default Administrator user imadmin to access and change IM Configuration.
The imadmin default password is “Zaq12wsx” (without the double quotes) and it is a good practice to change this password as soon as possible.
Enabling IM module
Accessing the IM Configuration panel will prompt the Incident Management Module configuration section, from which is possible to enable the module by operating the Incident Management Module toggle switch first, and then clicking on the Enable button.

Once the module has been enabled, all the configuration section will show up allowing to fully customize the module.
How to: Configuration
Configuring Groups
Before configuring groups within the IM module, it is necessary to define all desired, or an initial set of IM users at SGBox level in SCM->Users->Users.
For everything to work best, when defining users, there are some rule to follow:
- A personal email address needs to be set for each user. The system will send operational messages and notification to that address.
- One or more Tenant needs to be associated to each user. IM operation will be limited to the Tenants to which each user is associated with.
- IM users needs to be associated, at least, to the predefined IM User profile.
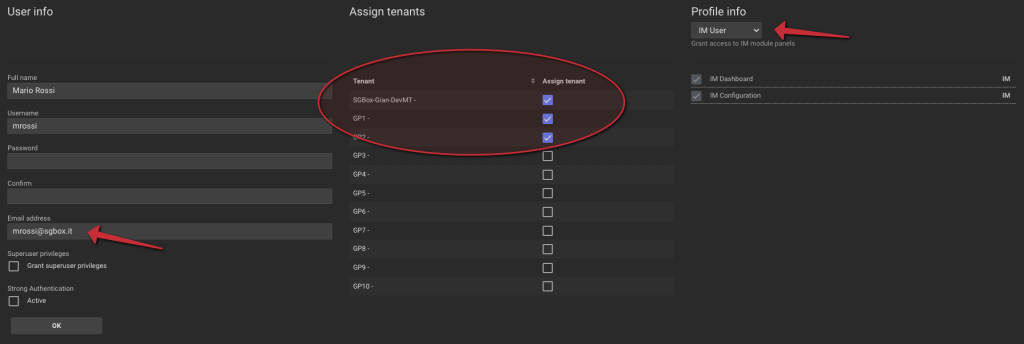
The Groups Configuration section
Once Users has been added to SGBox, access the configuration panel selecting the IM -> Configuration menu option on the left-side menu and then, in the Groups Configuration section, create your own Groups, define the Groups hierarchy and add users to the groups.
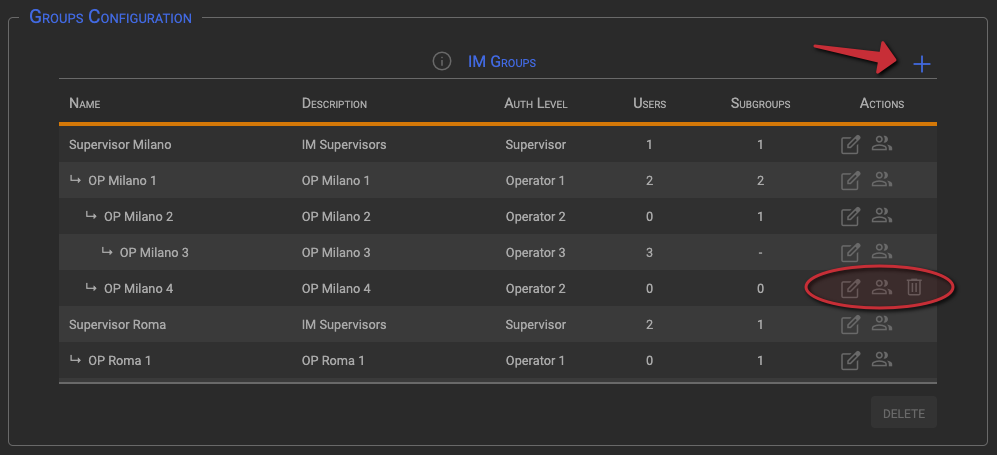
The first time you access the panel it will show an empty table. To add new groups simply click on the + icon in the top-right corner of the section and a fill the form with the requested values.
Possible actions:
- Add groups by clicking the + icon
- Edit groups definition by clicking the edit icon under the Actions column
- Add, or delete users to/from a group by clicking the users icon under the Actions column
- Delete a group by clicking the trash icon under the Actions column
Assumptions:
- A user can belong to one or more groups.
- Supervisors groups cannot have a parent group.
- Authorization level 3 Operators groups cannot have child groups.
- A group can be deleted only if it has no child groups and does not contain any user.
Dealing with authorization levels
Remember that the lower the value, the higher the authorization level.
Summing up:
- Auth level 0: Automatically set by the system for imadmin and Supervisors. This is the highest authorization level.
- Auth level 1: Manually assigned to an operator group
- Auth level 2: Manually assigned to an operator group
- Auth level 3: Manually assigned to an operator group
How level’s hierarchy works
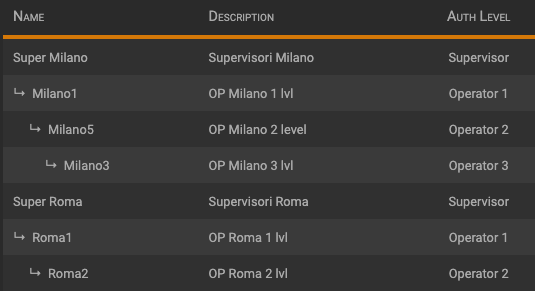
Looks at the example above, a 2nd level Operator in the OP Milano 2 group can delegate his Issues to other Operators only if they belongs to another level 2 Group (like OP Milano 4) under the same level 1 Group (OP Milano 1) or if they belongs to one of his child level 3 Group (like OP Milano3).
Add a Group
Clicking on the + icon in the upper-right corner of the Group Configuration section will show up the Add Group panel:

Fill the Add Group fields then click the Add button to add the new Group.
- Name – Mandatory, the Group name.
- Description – Optional, the Group description.
- Authorization Level – Mandatory, the Group Authorization level (determines the Group hierarchy).
- Parent Group – Mandatory for any Group, but the Supervisor one.
The Parent Group is very important in creating your SOC hierarchy.
The system will make available, from time to time, the Parent Groups that can be linked to the Group being created. There are just a couple of rules about how to set the Parent Group parameter:
- Level 0 Groups (Supervisor) are at the top of the hierarchy, so they cannot have a Parent Group.
- Level 3 Groups (Operator) are the lowest level in the hierarchy, so they cannot have children Groups.
Tip: See the above Authorization Levels chapter to go into Authorization Levels detail.
Edit a Group
Clicking on a Group’s edit icon, in the Group row, will show up the Edit Group section:

This section is exactly the same as the Add Group section, and is filled with the current values. Make your changes then click on the Update button to save
Add/Delete Users from Group
Clicking on a Group’s users icon, in the Group row, will show up the Group User(s) Detail section:

Delete Users
Clicking on a User’s trash icon, in the User row, will toggle the User deletion. Users marked for deletion will become red, then you can confirm the operation clicking the Delete button.
Tip: Note that this will not remove the user from the SGBox nor the IM itself, it will simply unlink the user from the group. If you need to completly remove an user both from IM and SGBox the best way is to delete the user from the SCM -> Users -> Users main menu option. Housekeeping procedures will take care of Issues eventually assigned/owned by the deleted user.
Add Users
To add one or more users, clicking on the + icon in the Group User(s) Detail section will show up the Add User(s) section:
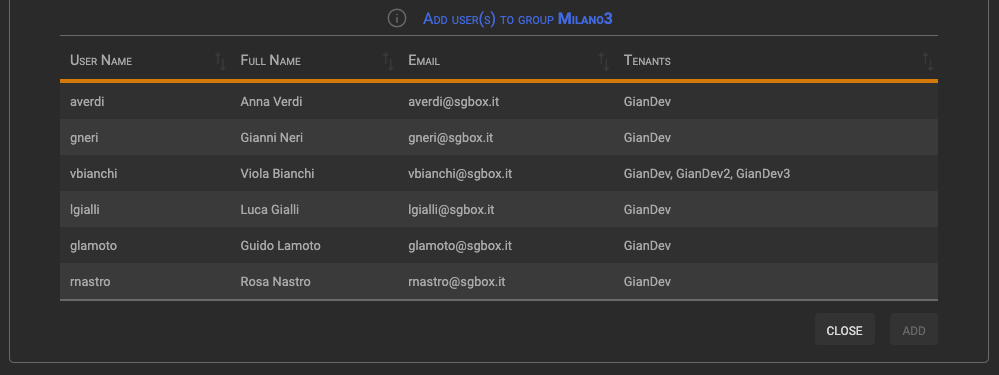
The system will show all the Users defined at SGBox level (SCM->Users->Users), but those already bound to the current Group.
By clicking on a user row you can toggle the User addition. Users marked for addition will become green, then you can confirm the operation clicking the Add button.
Tip: The Tenant column shows the Tenants to which the user has access, this can be useful when building a Groups hierarchy.
Tip: The add button will be enabled only if there are Users marked for addition.
Configuring SLA
In the SLA Configuration section, the system will list the Tenants defined in the current SGBox installation and, for each of them, it will be possible to specify custom SLA settings. The SLA definition section behave different if the Issues Prioritization is enable or not. The Issues Prioritization option can be set in the Configuration Options section.
Regardless of the Issues prioritization, the SLA configuration functions works the same way. Let’s see available option and functions:
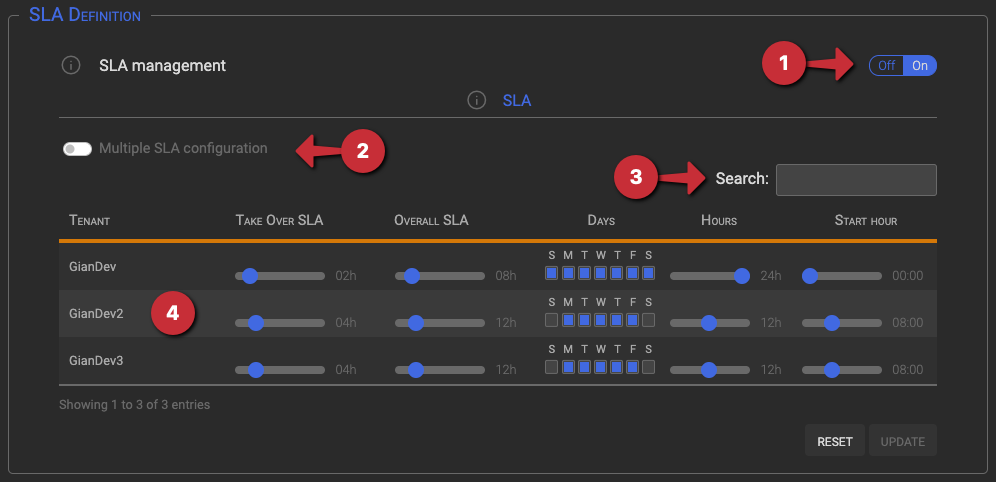
- SLA Management can be completely enabled or disabled by operating the SLA Management toggle switch (1).
- Changes to SLA setting can be done, tenant by Tenant, simply by acting on the controls present on the row of the Tenant itself (4), and if needed ( for example in case of large multi-tenant installation like SOC) it is possible to massively apply a specific configuration to more than one Tenant at time operating the Multiple SLA configuration toggle switch (2) first, ant then using the Search option (3).
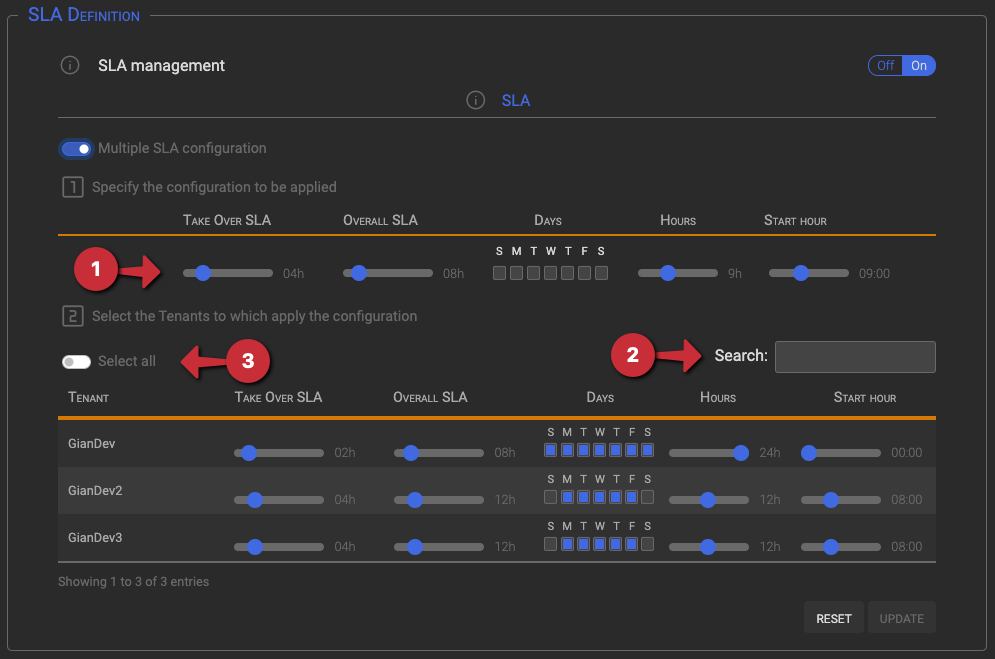
- Turning on the Multiple SLA configuration toggle switch, a hidden section will be shown to allow to specify the SLA settings to be massively applied (1). It is possible to select the Tenants to which apply the configuration mask selecting the Tenants one by one, clicking the Tenant row, acting on the Select all toggle switch (3) and/or using the Search function (2).
Note: When the Multiple SLA configuration toggle switch is turned on, the Multiple SLA configuration (1) will always be applied to each selected Tenant, also if you change the Tenant row with different values.
Column description:
- Tenant: The tenant name
- Take Over SLA: Sets the Take Over SLA for the tenant.
- Overall SLA: Sets the Overall SLA for the tenant.
- Days: Sets the days of the week in which the SLA is active
- Hours: Sets for how many hours the SLA will be active.
- Start hour: Set the SLA activity start time.
For example, in the above picture, the GianDev Tenant SLA configuration means that the SLA will be active from Sunday to Saturday, for 24 hours a day starting at midnight, with a TakeOver SLA of 2 hours and an Overall SLA of 8 hours. Practically is a 24×7 SLA definition.
The other two Tenants, GianDev2 and GianDev3, are configured with a SLA active from Monday to Friday, for 12 hours a day starting at 08:00, with a TakeOver SLA of 4 hours and an Overall SLA of 12 hours. Practically is a 12×5 SLA definition.
SLA Prioritization
When the Issues Prioritization is turned on, the SLA management section changes giving the possibility to specify different SLA for the different priorities. Also if the panels changes in their aspect, the operational logic remain the same as when Issues prioritization is disabled. Below an example of the SLA Management panel when Issues prioritization is enabled.
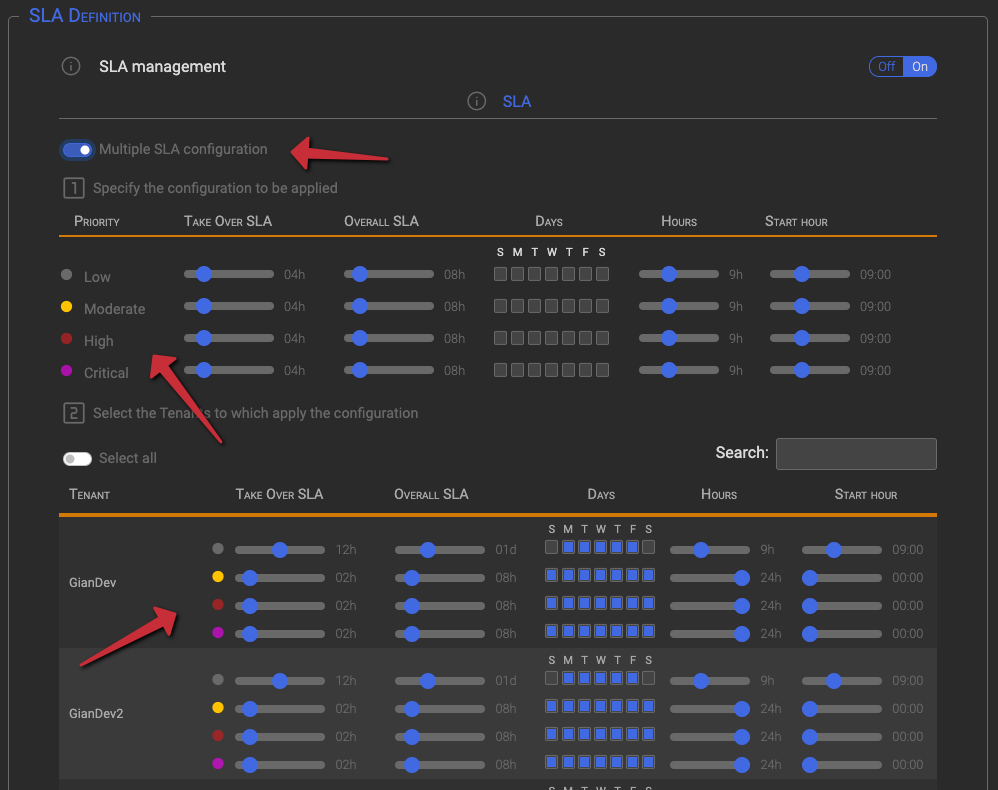
- Tip: Remember SLA management can be totally disabled by acting on the SLA Management toggle switch
- Tip: Remember Issue Prioritization can be enabled/disabled from the Configuration options section.
- Tip: Remember, When the Multiple SLA configuration toggle switch is turned on, the Multiple SLA configuration (1) will always be applied to each selected Tenant, also if you change the Tenant row with different values.
Configuring Automatic Assignment
The system offers the possibility to automatically assign new Issues to Operators and Groups without the intervention of a Supervisor. The functionality can be turned on or off by operating the Automatic Issue Assignment switch (1) in the box top-right corner.
After enabling the Automatic Issue Assignment it will be possible to create and manage custom Issue/Group association rules selecting which Issue Classes are to be assigned to which Groups.
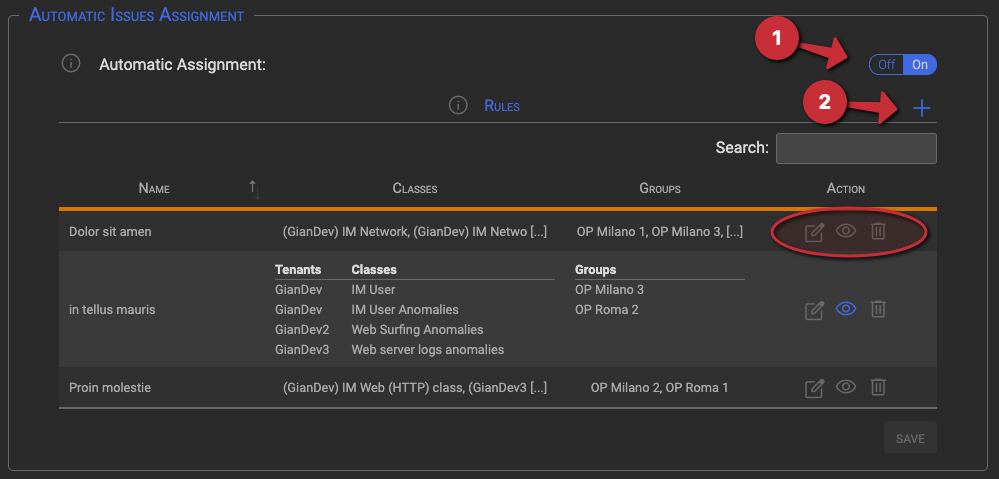
Note: If the Automatic assignment is disabled, each new Issue will need to be manually assigned to Operators, by a supervisor, before Operators can take over the Issue itself.
Possible actions:
- Enable/Disable Automatic Issues assignment by operating the switch
- Add rules by clicking the + icon (2)
- Edit rules and add, or delete classes and groups users to/from a rule by clicking the edit icon under the Action column
- View rule detail by clicking the eye icon under the Action column (as in the second row of the above picture)
- Delete a Rule by clicking the trash icon under the Action colum
Adding or editing a rule
Creating or editing a rule is as simple as select classes and groups to be bound together, by clicking on the desired rows and set or modify the rule name.
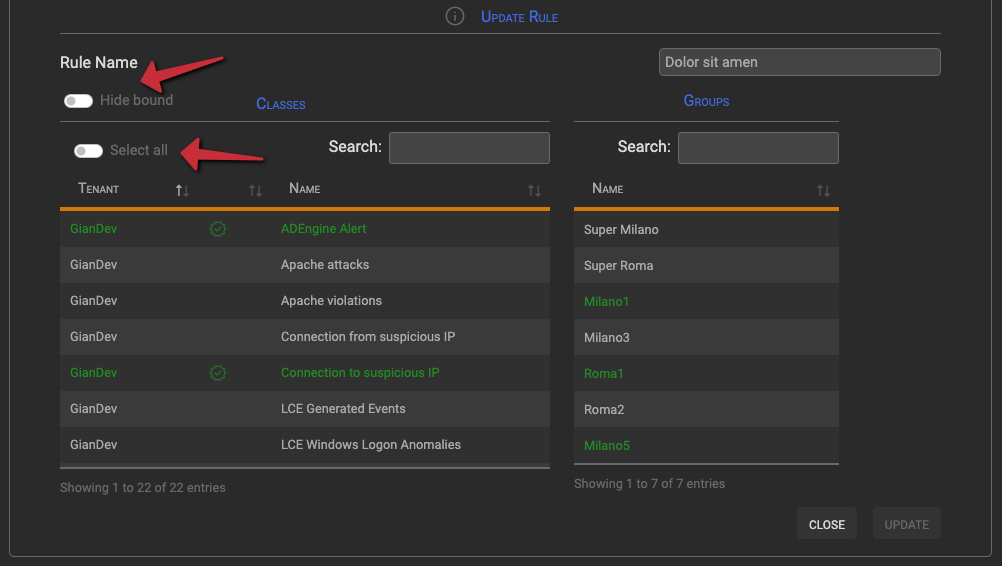
When in the Add/Update rule section, operating the Hide bound toggle switch will show/hide already bound classes.
Both Classes and Groups selection tables can be searched and, for the Classes table only, operating the Select all toggle switch, will select all the not yet bound Classes or all the Classes resulting from a search.
Note: At least a Class and a Group needs to be selected to create an automatic assignment rule.
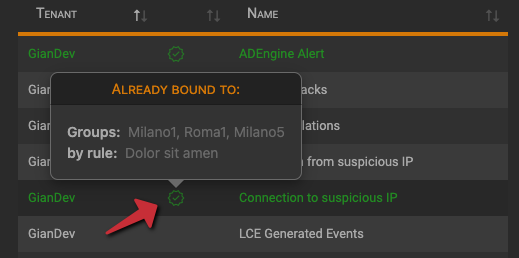
Tip: Hovering on a check badge will show Class bound details.
Tip: Remember, Automatic Issues Assignment can be totally disabled by acting on the Automatic Assignment switch (1).
Configuring Threat Intelligence Based Enrichment
With the Threat Intelligence Based Enrichment it is possible to enrich Issues’ Incidents adding information coming from one or more Threat Intelligence sources.
Using the SGBox PlayBooks module, we can define and schedule specific playbooks to download IOC lists from free or paid sources. These lists can then be matched to specific IM KPIs to check if incoming events founds a match in any of the lists. For example we can use TI Enrichment to check if the source IP of an incoming events is part of a known Botnet or Command&Control.
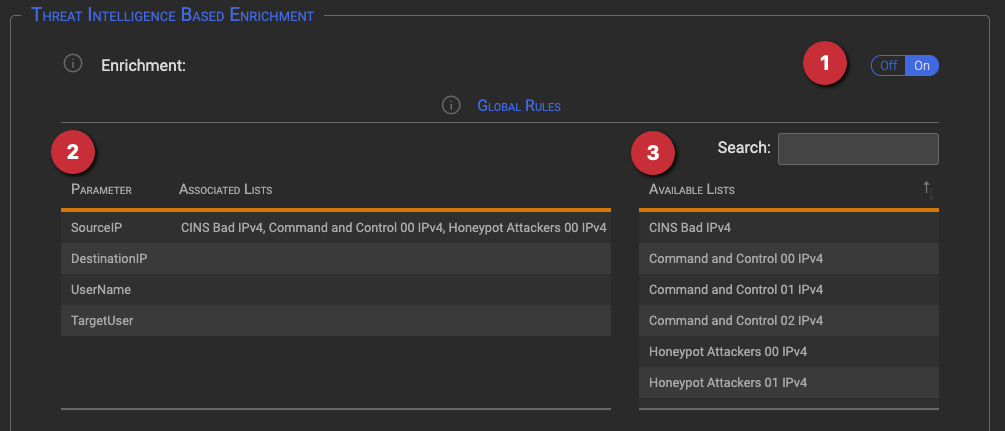
The Threat Intelligence Based Enrichment can be enabled/disabled by acting on the On/Off switch in the top right corner of the TI Enrichment box. (1)
Configuring Threat Intelligence Based Enrichment is divided into two sections: the Global Rules and the Tenants’ Rules.
TI Enrichment Global Rules
Within the Global Rules section there is only one rule that is valid for all the Tenants in the current SGBox installation, this means that the associations defined here will be applied to Incidents generated by all Tenants. In this case, the Available Lists table (3) contains those list that has been genenrated on the Manager instance and therfore are available on each new or exisiting Tenant.
To associate a Threat Intelligence List with an IM KPI Parameter:
- Select the parameter to associate the list with, from the left table (2). The parameter will turn to green. It is possible to select only one parameter at time.
- Toggle Add/Remove List association by clicking on the Available Lists table on the right (3). Added list will turn to green and will appear aside the selected parameter in the left table.
- Clicking on an already selected List will remove the List from the association.
TI Enrichment Tenants’ Rules
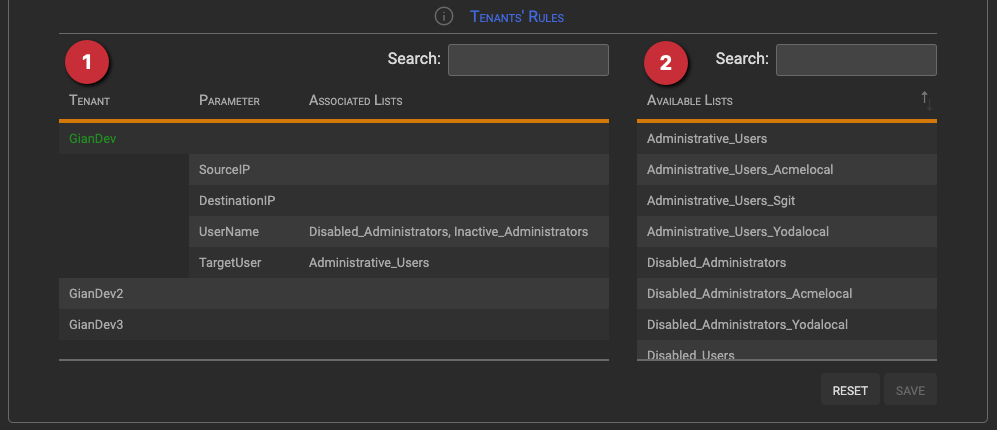
Within the Tenants’ Rules section we can find an additional rule for each Tenant. Through this rules it is possible to associate, to the IM KPIs, Tenant specific TI Lists in addition to the global ones. In this case the Available Lists table (2) will contain Tenant specific Lists only.
The process to associate a Tenant specific Threat Intelligence List with an IM KPI Parameter is quite similar to the previous one:
- Select the Tenant for which you want to create the association from the Tenants table on the left (1). The selected Tenant name will turn to green and the list of IM KPI parameters is shown.
- Select the parameter to associate the list with. The parameter will turn to green. It is possible to select only one parameter at time.
- Toggle Add/Remove List association by clicking on the Available Lists table on the right (2). Added list will turn to green and will appear aside the selected parameter in the left table.
- Clicking on an already selected List will remove the List from the association.
TI Enrichment Evidencies
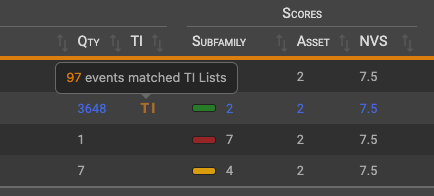
After configuring the Threat Intelligence Based Enrichment, you’ll be notified about Threat Intelligence matches by a pulsing TI text that will apper aside the objects containing events that matched with one or more TI Lists.
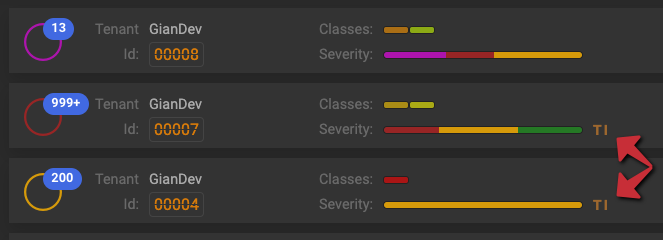
Tip: Hovering on the TI notification you’ll get additional detail on the findings.
 .
. 
Configuring Tenants’ Criteria
The Tenants’ Criteria section allows to centrally manage Tenants’ operations.
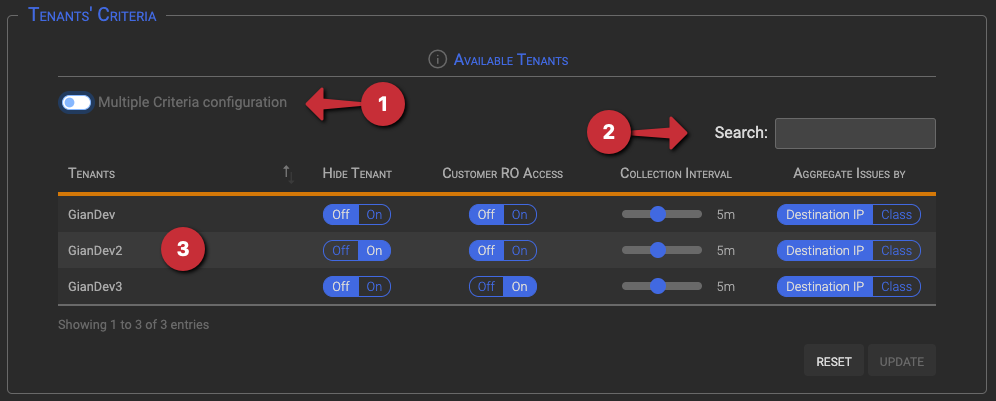
Tenants’ criteria can be set globally or Tenant by Tenant but, before talking about mass changes, let’s see what we can operate in this section.
- The Multiple Criteria configuration toggle switch (1) will open a hidden section to set bulk updates for all Tenants.
- Tenants are automatically selected for update when one of their options is changed (3) or if searched from the search box (2)
Once Tenants’ options has been set properly, click the Update button to consolidate changes.
Understanding Options:
- Hide Tenant: By enabling/disabling the Hide Tenant option we can prevent a Tenant and all its Issues and Alarms from being centrally managed. This option is very useful for Service Providers, such as SOCs, when one or more customers have centrally managed SOC services except the Incident Management one.
- Customer RO Access: By turning on this option we enable the customer to access thier Incident Management Dashboard, in Read-Only mode, directly from their tenant.
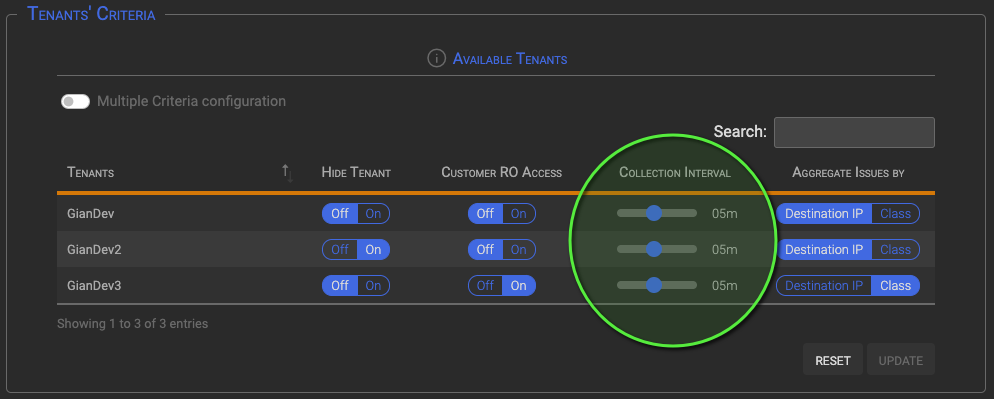
- Collection Interval: By changing the Collection Interval option we change the Alarm collection interval for that Tenant, so Alarms will be collected and aggregated each n minutes depending on the value set.
- Aggregate Issues by: This option determines how incoming Alarm will be aggregated into Issue for that Tenant.
- DestinationIP: Selecting DestinationIP means that all Alarms having the same destination IP will be aggregated in the same Issue.
- Class: Selecting Class means that Alarms will be aggregated in the same Issue if they belongs to the same SGBox Incident Class.
Tip: It is also possible to set specific Alarm aggregation criteria from the panels where the Alarms are created.
Note: Changing the aggregation criteria on a running environment with open Issues can lead to situation with incongruent Issues.
Multiple Criteria configuration
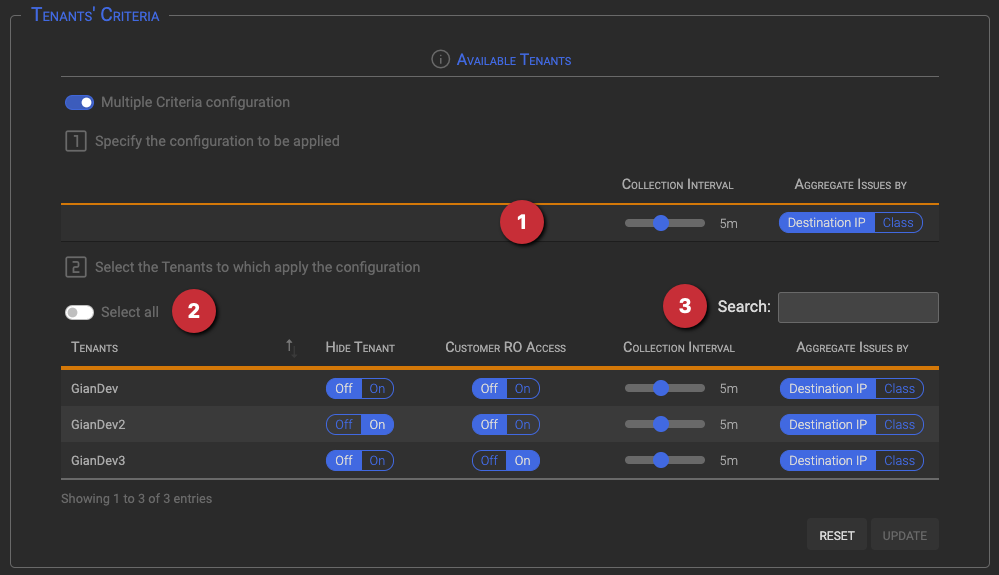
By operating the Multiple Criteria configuration toggle switch, a hidden section is shown and through the bulk configuration line (1) we can set the options to be bulk applied to the selected Tenants.
Once bulk options (1) has been set, we need to select the Tenants to which apply the configuration. To select Tenants you can:
- Operate the Select all toggle switch (2) that will toggle the selection of all defined tenants and Tenants names will turn to green. Once Tenants has been selected they can be de-selected clicking on their names.
- Search for the Tenants you want to apply the configuration to using the search box (3). Selected tenants will turn to green.
- Manually select the Tenants you want to apply the configuration to by clicking on their names.
When Tenants’ options has been set properly, click the Update button to consolidate changes.
Configuring Options
In the Configure Options box it is possible to configure several IM Module options as IM logs retention, Initial Issues display order, Number of Issue’s history backup and many others.
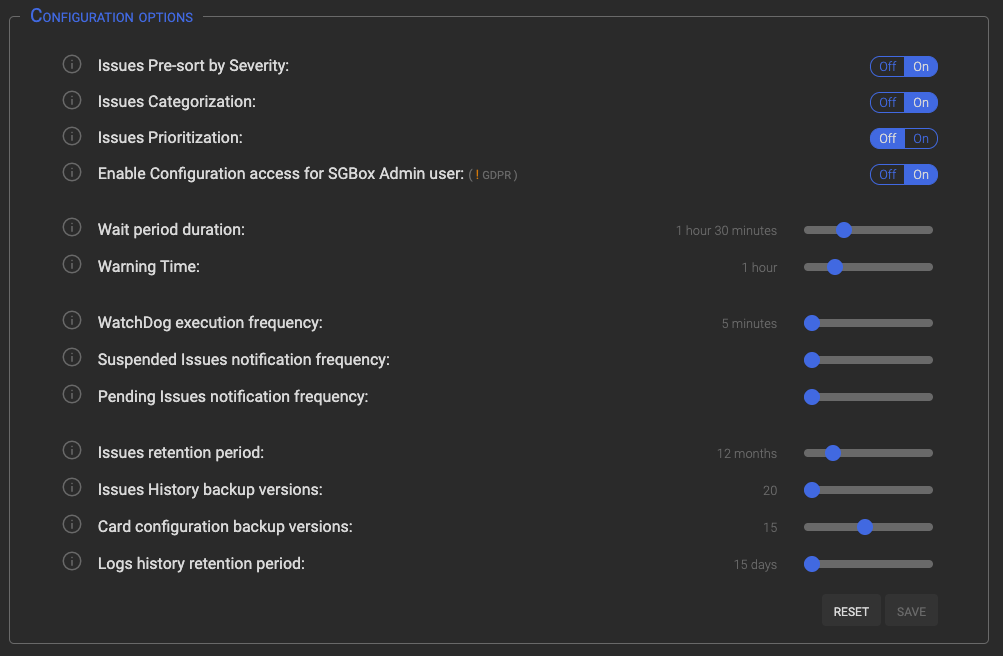
Available Options
Available option list:
- Issues Pre-sort by Severity: Enable/Disable Issues presort by Severity. This means that regardless of other ordering options Issues will be sorted by their Severity first. More in general Issues ordering is recursively nested following these rules:
- If the Pre-sort by Severity is enabled, Issues are ordered by their severity first, then by Creation Date in ascending or descending order depending on the selected value. On the contrary they will be initially ordered by Creation Date.
- If order by Priority or Category are selected, then Issues will be ordered by Severity (if enabled) then by Priority or Category and subsequently by Creation Date.
- If order by Priority and/or Category are selected, then Issues will be ordered by Severity (if enabled), then by Priority, subsequently by Category and lastly by Creation Date
- Issues Pre-sort by Severity: Enable/Disable Issues presort by Severity. This means that regardless of other ordering options Issues will be sorted by their Severity first. More in general Issues ordering is recursively nested following these rules:
Tip: Issues Priority and Category can be set from the IM Dashboard when editing an Issue.

- Issues Categorization: Enable/Disable Issue Categorization
- Issues Prioritization: Enable/Disable Issue Prioritization
- Enable Configuration access for SGBox Admin user: Enable/Disable the Admin user to access and operate the IM Configuration panel. In medium to large and/or structured organization like SOC, enabling the SGBox admin user to access the configuration is strongly discouraged as this is not compliant with GDPR or with local equivalent Data Protection Regulations. However, for small organization, this approach can be an easyer way to the Incident Management.
- Wait period duration: Specify the interval after which the waiting status will expire, retuning the Issue to its original state.
- Warning Time: Specify how long, before a SLA is exceeded, you want to be notified. For example if the SLA is set to 4 hours, and the Warning Time is set to 1 hour, the system will start notify about the SLA expiration after 3 hours since the Issue creation (that is 1 hour before the expiration). A second notification will be sent when the wait time has reach his half that, in the example, is 30 minutes before SLA expiration.
- WatchDog execution frequency: WatchDog is the backend Issue manager, it manage SLA computation as well as the IM daily housekeeping. Be careful that increasing this value will lead to widening the spread relating to the calculations of the deadlines.
- Suspended Issues notification frequency: Specifies after how many time we want to be notified that an Issue is still suspended.
- Pending Issues notification frequency: Specifies after how many time we want to be notified that an Issue has not been take over by an operator. To be effective this value should be less than the Take Over SLA one.
- Issues retention period: Specifies number of month after which closed Issues an their Incidents will be cleaned up from the database
- Issues History backup versions: Specifies number of Issue’s history backup versions we want to keep
- Card configuration backup versions: Specifies number of Cards configuration backup versions we want to keep
- Logs history retention period: The number of days after which the WatchDog execution logs will be cleaned up.
How to: The Dashboard
The Dashboard panel
The Dashboard is the main module panel, through the dashboard is possible to manage the whole Issues life cycle.
It’s useful to know that Supervisors and Operators Dashboards are quite different between each other; specific Supervisors functions has been removed from the Operators Dashboard to avoid operational misunderstanding.
Accessing the dashboard
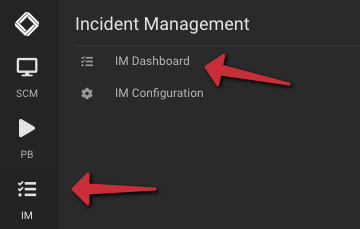
To access the configuration panel select IM -> Dashboard menu option on the left-side menu.
Both Dashboards, also if different, have the same layout and works in the same way. Here below a representation of the sections that are composing the Dashboard:

The Header section
In the header section, the green one, you can perform the following actions:
- Check the currently logged-on user and his role hovering on the user icon in the top-left corner.
- Access the Pending Issues take over panel by clicking on the eye icon, this will show all the Issues that can be taken over by the current user.
Note: The take over panel is available only when there are Issues assigned, but not yet taken over, to the current user or to one or more of the group(s) to which the user belong.
- Set the number of Issues per page
- Toggle and/or set the auto-refresh period
- Manually refresh the Issues list by clicking the reload icon
- Display the Issue’s Status Legenda by clicking the Legenda icon
- Jump to this KB
- Check the in-app messages for the current user by clicking on the envelope icon
Issues’ take over
One of the milestones in the Issues’ management is the Issues’ take over. This important task can be taken by both Operators and Supervisors, depending on the cases.
![]()
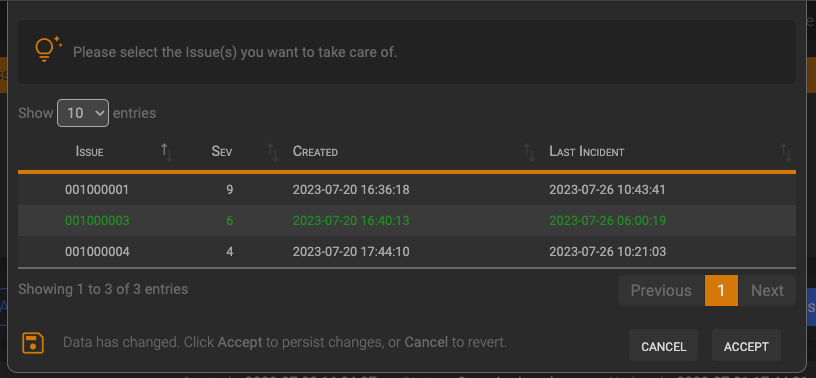
Once there are Issues assigned to the logged-in user or to one of the groups to which the user belongs the “There are pending Issues for you!” message will appear on the header, followed by a blue eye icon.
By clicking on eye icon, the Issues take over drawer will be shown. Clicking on the rows of the issues you want to take over will toggle issues’ selection and selected rows will turn to green to acknowledge the selection. When you are done, click the Accept button to take over selected Issues.
The in-App messages
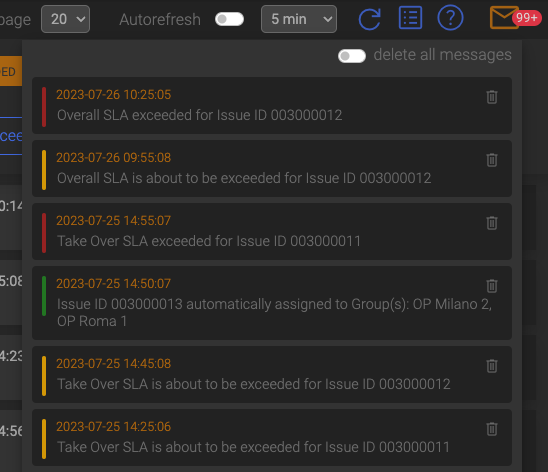
By clicking on the Envelope icon, in the upper right corner, the message drawer will open showing messages addressed to the current user. The red bubble close to the envelope will show the number of in-app messages.
If single messages can be removed by clicking the Trash icon to the right, all messages can be removed, at the same time, by operating the “delete all messages” toggle switch.
Tip: If there are no messages for the logged-in user, the envelope icon will be gray and the message drawer will not open.
The Cards section
The Cards section, the magenta one, behave different for Supervisors and Operators.
Supervisors
Looking at the Cards section, Supervisors can check the overall Issues status. Each Card contains the count of the Issues that currently are in the status shown by the Card title. The color of the counter indicates if, and by how much, the current number of Issues, which are in the indicated state, exceeds the thresholds set for the state itself.
A green counter means that the counter in below the low threshold, a yellow counter means that the counter is between the low and the high threshold and a red counter means that the counter has exceeded the high threshold.
To configure Card’s thresholds click the gear icon in the top-right corner of the chosen Card, then slide the controls to set the new threshold and click the save button to consolidate changes.

Tip: Cards counters are automatically updated each time the dashboard is refreshed.
Tip: To free up space on the Dashboard, if needed, click on the blue pin icon in the upper-left corner of the Card section to toggle the Cards section view.
![]()
Operators
In the Cards section, Operators can check the current status of their own Issues. Each Card contains the count of the Issues that currently are in the status shown by the Card title.
The “Unassigned” and the “Assign Pending” Cards are missing, because out of scope for an Operator, all the counters, but the SLA and the Suspended ones, are white and the Cards cannot be customized.

Tip: The cards are automatically updated each time the dashboard is refreshed.
Tip: To free space on the Dashboard, click on the blue pin icon in the upper-left corner of the Card section to toggle the Cards section view.
The Filter section
The Filter section, the yellow one in the full Dashboard image above, contains a list of selection criteria to dynamically filter the Issues list and behave different for Supervisors and Operators; in both cases the section is logically split in 4 areas:
Supervisor
![]()
Operator

Filter groups
Customer/User filter the green one
- Use the Tenant filter to filter Issues by specific Tenant
- Use the Users filter to filter Issues owned by a specific user
Primary Status filter the yellow one
- Use the Show filter to select the kind of Issues to be shown in the list (this will a sub-set of the Customer/User filter result)..
Secondary Status filter the magenta one
- Use the Select filter to choose the status to filter the Issues list for (this will a sub-set of the Primary Status filter result).
Ordering the red one
- Ordering is recursively nested following these rules:
- If the Pre-sort by Severity is enabled, Issues are ordered by their severity first, then by Creation Date in ascending or descending order depending on the selected value. On the contrary they will be initially ordered by Creation Date.
- If order by Priority or Category are selected, then Issues will be ordered by Severity (if enabled) then by Priority or Category and subsequently by Creation Date.
- If both order by Priority and Category are selected, then Issues will be ordered by Severity (if enabled), then by Priority, subsequently by Category and lastly by Creation Date.
The Issues section
The Issues section is the module core, here is where all the actions that can be performed on Issues and Incidents takes place. Each Issue line contains pertinent information about the Issue and buttons for accessing the detail, analysis and modification panels of the Issue itself, so starting from left to right we have:

- The Issue section, the green one, containing a circle icon whose color indicate the Issue severity and a blue bubble indicating the number of Incident contained in the Issue itself, the Issue originating Tenant name and the 9 digits unique Issue ID.
Tip: The issue severity color represent the highest severity found between the Issue’s Incidents.
- The Detailed Severity section, the magenta one, containing Issue’s severity indicators (see below for a detailed explanation).
- The Date section, the white one, containing Issue relevant dates. This section is updated step by step, by the system itself or by Supervisors and/or Operators actions. This means that, for example, the Assigned date will appear only after the Issue has been taken over by an Operator as well as the Owner name.
- The Indicators section, the yellow one, contains icons to summarise Issue’s status, priority and category.
Tip: Hovering on any of the indicators will show the indicator meaning
- The Action section, the red one, contains the buttons to trigger Issues management. (see below for a detailed explanation).
The Detailed Severity section
This section contains two composed indicators whose goal is to tell us something more about the real Issue’s severity.

The Classes indicator represent the Issue’s top 10 Class severity. Looking at this indicator we can immediately know how may, and wich, Events classes are consolitated in the Issue as well as their individual severity. Class severity is represented as a color gradient from green to red, spitted in 10 levels, and calculated as follows: given 100 the total weight of all the incidents of the issue, the severity of a class is calculated on the basis of the overall weight of the incidents of that class, related as a percentage of the total weight of the issue. Consequently, the color of the indicator is assigned based on the percentage weight of the class on the total therefore, at the lowest level, the percentages between 0% and 10% will be represented in green, while, at the highest level, the percentages above 90% will be represented in red. This is very useful in determining the most critical classes.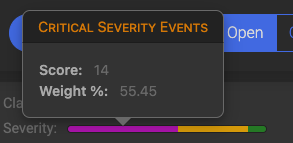
Tip: Hovering on class indicators will show the Class name in the pop-up header, his score and his weight percentage within the Issue.
The Severity indicator works with the same logic regarding percentage calculations, but unlike the class indicator, events are grouped according to their severity regardless of their class. This allows us to derive the severity of an Issue on 4 levels, based on the specific weight of each individual event. We use the event’s subfamily score to determine the 4 levels as follows:

Low Severity: sub-family score <= 3
Medium Severity: sub-family score > 3 and <= 6 (Yellow)
High Severity: sub-family score > 6 and <= 8 (Red)
Critical Severity: sub-family score > 8 and <= 10 (Magenta)
After determining the event severity level, its overall score is calculated. The calculation of the score is quite complex and takes advantage of several KPIs such as the events cardinality within the Issue, the relevance and the vulnerability of the affected host and several others.
So, in the above example we have that the Issue’s severity is composed as follows: 55.45% by events having a Critical severity, 35.64% by events having a Medium severity and 8.91% by events having a Low severity.
Tip: See the below Issue Detail section for more info about this argument.
How to operate the dashboard
Issue Details

By clicking the Issue Details button, a drawer will open showing the General details and the Aggregated details menu sections on the left:
The General section contains the following:
- The Issue Statistics panel shows a detailed view about Classes and Events severity (see “The Detailed Severity section” paragraph above)

- The Incident List panel shows the complete list of events contained in the Issue

- The Timeline panell shows a scrollable timeline history of the current Issue where all the action taken against the Issue, both automatic or manual, are registered. The panel display some overall info (1), the scrollable timeline (2), an events order toggle and a timeline update options (3).

The Aggregates section contain the following Issue’s KPIs aggregated data
- Associated Hosts
- Source Events
- Severity
- Source Users
- Target Users
- Source IPs
- Destination IPs
KPI aggregated views look the same for all KPIs and are made up by the following objects:
- A Top 10 donut chart for the current KPI
- A “last 48 hours” bar graph representing the number of Incidents by hour
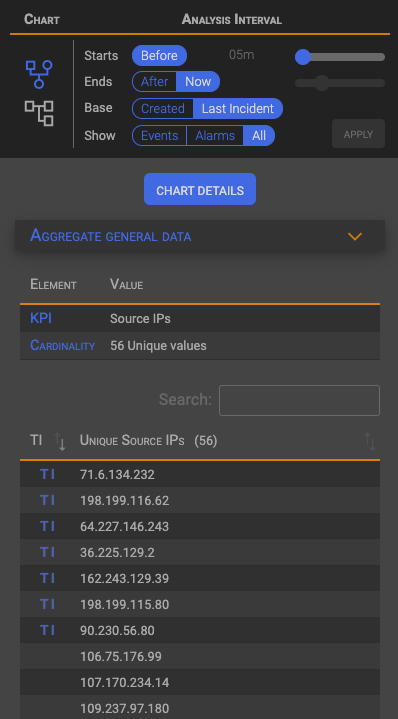
- A searchable whole list of KPI values

Graphical Analysis
By clicking the Graphical Analysis button, the Issue graphical representation side panel will show up. The panel contains two section, the Chart and a right side menu and context area.
Type Force Chart
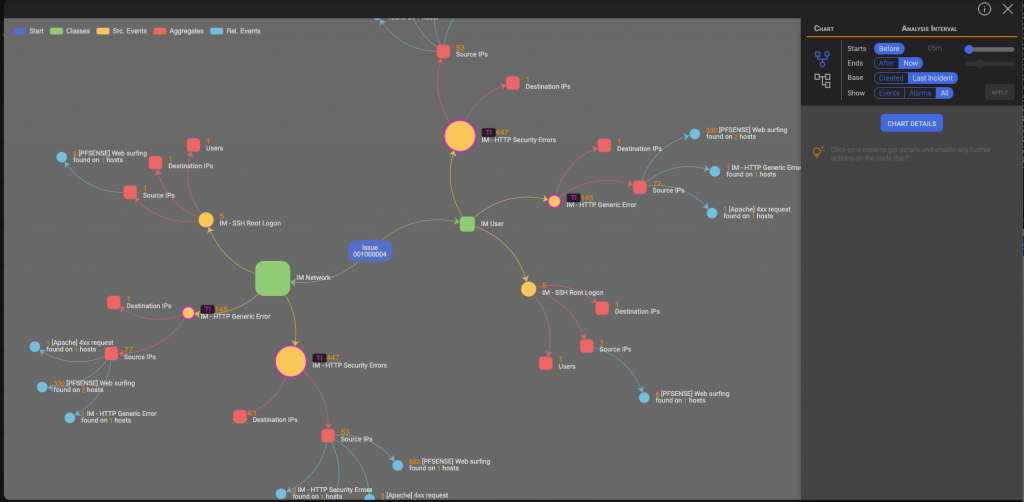
Understanding the Chart
As you can see in the picture the chart is whole of information, let’s put things in order! Looking at the legenda, in the upper left corner, we can identify chart objects as follows:
- Start: Is the starting point, represent the Issue.
- Classes: A direct connection to the Issue for each of the classes involved in the Issue itself.
- Source Events: Each Class is then split by his patterns (incidents).
- Aggregates: Each Source Event is then aggregated and splitted by his KPIs
- Related Events: In the end, for each aggregate, the whole events base is searched for other events and incidents, having the same KPI in common, occurred before and after the Issue creation time
There are a couple of things more to be specified:
- Object Size: Given 100 the weight of the Issue, the size of the objects is proportional to the percentage of the weight of each object.
- Threat Intelligence: Objects whose KPIs are matching one or more Threat Intelligence Lists, are surrounded by a Magenta border and presents the TI icon in their legend.
Type Tree Chart
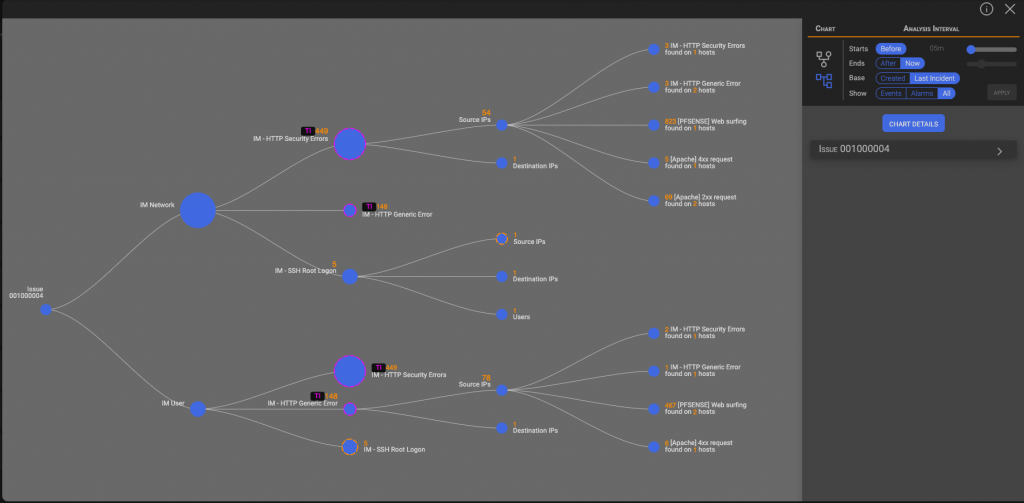
Understanding the Chart
As in the type Force, in the chart type Tree we’ve the same objects left to right ordered. So the first object is the “Start”, followed by all other objects in their order “Classes”, “Source Events”, “Aggregates” and “Relater Events”.
Also in the type Tree chart, the size of the objects is proportional to the percentage of the weight of each object. Objects matching one or more Threat Intelligence Lists, are still surrounded by a Magenta border and presents the TI icon in their legend.
Tip: A dotted border surrounding an object means that the surrounded object contains other objects.
Operating the chart
The Chart menu
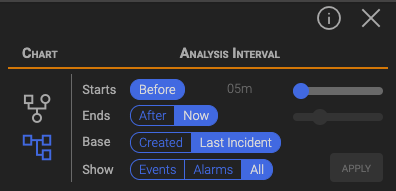
Chart Setting area is vertically split in the Chart selection and in the Analysis Interval sections.
In the Chart section we can select the proper chart format to analize the Issue. There are two types of chart you can choose from, the Force type one (see above) and the Tree type one (see below). Both types contains the same information, just presented in a different way. Just click the chart icons to swap the charts.
How to set Analisys Interval options
- Starts: Adjust the cursor to set how long, before the Issue was created, you want to start to collect Related Events
- Ends: Selecting “After” will enable the cursor to set how long, after the Issue was created, to stop the events collection. Selecting “Now” will collect all related events generated from the “Starts” time until now.
- Base: Sets the analysis start time by selecting “Created” or “Last Incident”, then “Starts” advance and “Ends” delay values will be applied consequently.
- Show: Select the type of the “Related Events” that will be shown in the chart.
Clicking on the Apply button will draw a new chart based on the specified options.
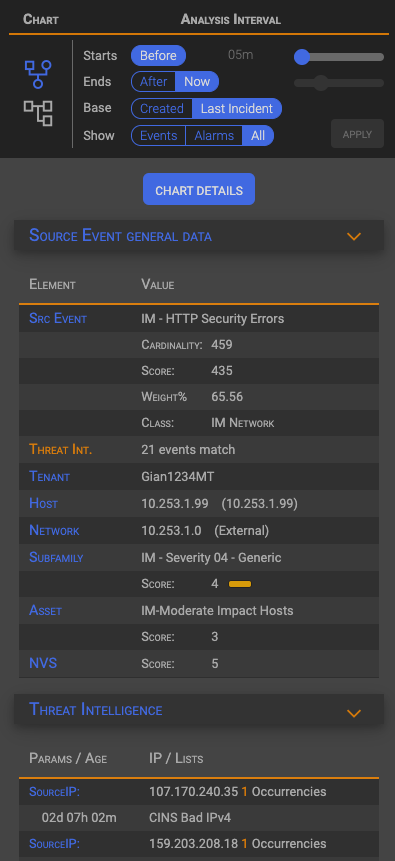
Chart object details
Regardless of the type of graph you are looking at, clicking on the various objects will show the selected object details, in the context area on the right. Here below some examples:
Issue Management

By clicking the Issue Management button, the Issue managemnt right drawer will show up. This panel is divided into an header and three sections: Assignment, Status and History.
The Header section
In the Header section it will be possible to set the Issue’s Priority and Category, if the respective options have been enabled in the IM Configuration panel, if not the Priority and the Category drop down menus will not be shown.
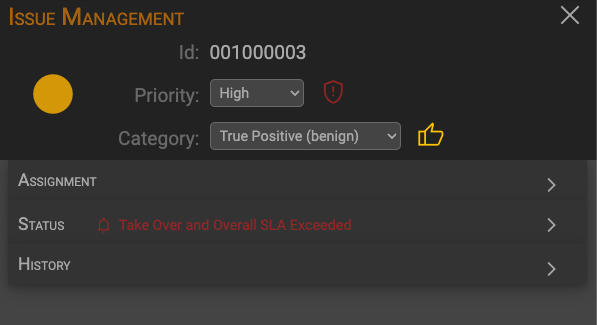
The other three sections Assignment, Status and History can be open and closed by clicking somewhere on the desired section header bar.
A common behavior for these sections is that the action buttons contained therein, changes automatically depending on the Issue state and the authorization level of the logged in user, showing the possible actions only when they can be taken.
The Assignment section
The Assignment section works only for open Issues, it is not possible to assign or reassign closed Issues, they need to be reopened first. Issues can be reopened, by changing their status, only by a Supervisor.
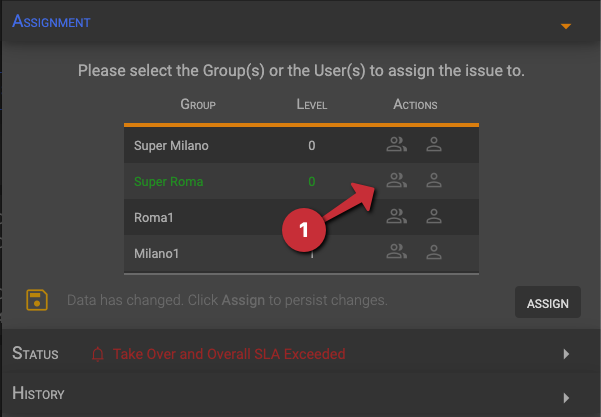
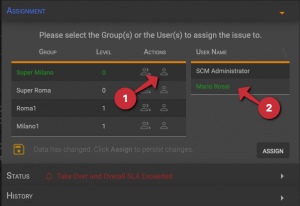
Issues can be assigned to one or more groups by clicking on the group icon of the target groups, or can be assigned to one or more users of a group by clicking on the user icon of the chosen group, and then selecting one or more users by clicking on their names.
Assigning an Issue to one or more groups means that all the users belonging to the selected groups can take charge of the Issue. The first users that claim the Issue became the owner and the Issue status change from Pending to Assigned. On the other hand, assigning an Issue to a user means that only that user can claim the Issue.
An Issue, under some circumstances, can be reassigned. In that cases the system will automatically show a Reassign button as well as the possible targets groups or users.
The Status section
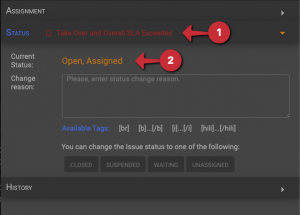
The Issue Status section reports, on his header, any SLA violations (1), if the SLA Management option is enabled in IM Configuration. The Issue current status is shown as well in the section body (2).
As told above available buttons will depend on the current Issue state and the current user authorization level.
A Change reason is required to document the request, before the current status can be changed. For obvious security reasons, HTML is not allowed within the comment area, please use provided tags to style your comments.
Considering that some action can only performed by Supervisors, Operators can escalate change requests in certain circumstances, for example when, after viewing an assigned issue, the operator determines that the issue needs to be reassigned to another user belonging to a different group than theirs, or when the SLA needs to be suspended.
See the above Issue Statuses chapter for more details on the possible states and their meaning.
The History section
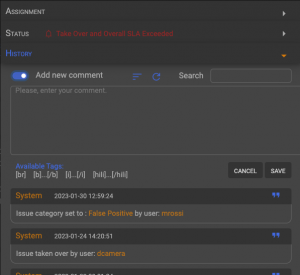
The History section, as his name told, preserve Issue history and allows Operators to add their own comments to the Issue by operating the Add new comment toggle switch.
As for Status change comments, HTML is not allowed within the comment area, please use provided tags to style your comments.
In the Issue history, in addition to the operators’ comments, all system and user actions are recorded.
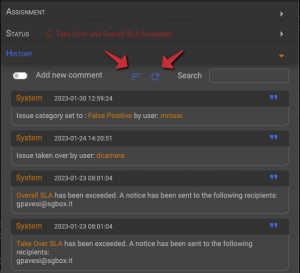
History comments are initially shown ordered by date descending (newest first). Ordering can be toggled clicking on the Order icon. Click on the Reload icon will refresh the comment list.
Backend
Backend operation
There are two main backend tasks: the IM Alarm Collection and the IM Issues Governance.
IM Alarm Collection
The IM Alarm Collection tasks, runs on each Tenant but the manager one, and takes care to harvest correlation rules generated events, aka Incidents, on a specific time interval basis. Correlation rules can be set from the LCE SGBox module, the Event Queries system, and any other module or function capable of generating alarm events.
The task execution frequency can be changed and set, from the IM Configuration panel, indivually for each Tenant acting on the Collection Interval slider in the Tenant’s Criteria configuration section.
Alarm Collection
Collected events are grouped in Issues depending by the Aggregation Criteria specified for the originating tenant, or for the events itself, and shown in the IM Dashboard.
Threat Intelligence Enrichment
Alarms KPIs are related with the defined Threat Intelligence Lists, as defined in IM Configuration in the Threat Intelligence Based Enrichment section.
IM Issues Governance
The IM Issues Governance task, that runs in the SGBox manager instance only, takes care to manage below sub-tasks for each tenant (also if the tenant is not centrally managed).
The task execution frequency can be changed, from the IM Configuration panel, on the SGBox manager instance in the Configuration Options section.
![]()
Governance Sub-tasks
- Issue level consistency checks
- Checks for Issues assigned to non existing Groups
- Checks for Issues assigned to empty groups
- Checks for Issues assigned to non existing Users
- Tenant level consistency checks
- Checks if the IM defined users are still present in SGBox users list. If not the IM User will be removed from all IM Groups and the ownership of his issues will be assigned to his supervisor
- Issue level consistency checks
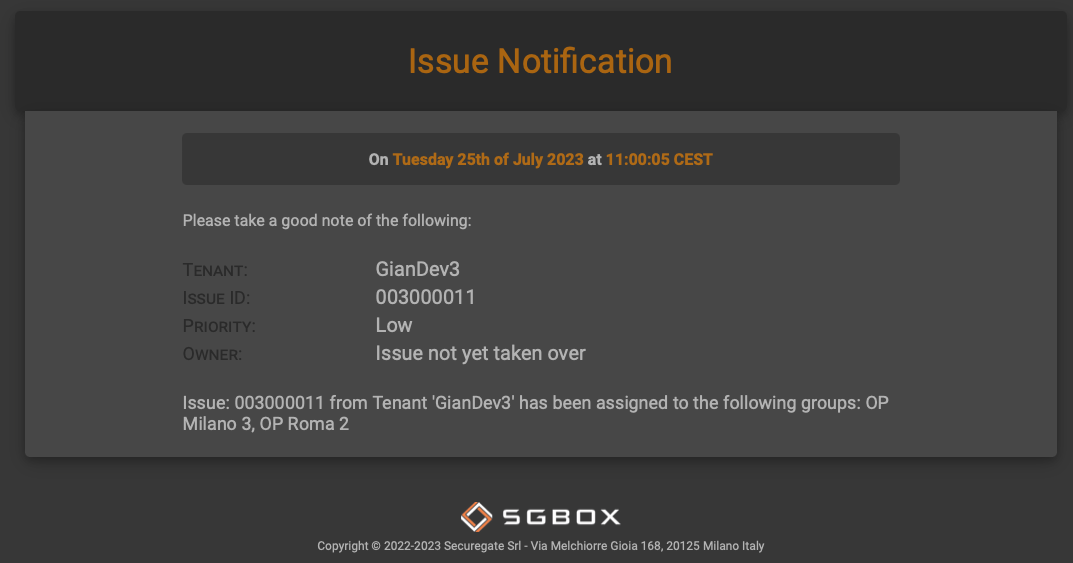
- Manages SLA expiration accordingly what defined in the IM Configuration in the SLA Definition section, and send proper notification both via e-amil and in with the in-app messages when needed.
- Manages Suspended and Pending Issues notification as defined in IM Configuration in the Configuration Options section

- Automatically resume Waiting Issues when the waiting period, set in IM Configuration in the Configuration Options section, expires
![]()
- Automatically assign Issues as defined in IM Configuration in the Automatic Issues Assignment section
- Performs housekeeping clean-up routines as defined in IM Configuration in the Configuration Options section

API
The Integration API
API parameters and functions
Through the im_issues API the following actions are available:
- Close an Issue (an “Issue closed via API” System comment will be added to the Issue’s history, when an issue is closed)
- Get Issue information
- Calling Method: POST
- Parameters:
- api_key – The API Key
- issue_id – The Issue ID to be closed or to query
- tenant_id – The Issue’s Tenant ID
- action – The action to be taken. Can be close or info
How to call the API (PHP example)
$server   = "https://<your_sgbox_ip>/sgbox/api/ima/im_issues";
$conn     = curl_init();
$postData = array("api_key"   => "<your_api_key>",
                  "issue_id"  => nn,
                  "tenant_id" => "<your_tenant_id>",
                  "action"    => "info" );
$postData = json_encode($postData);

curl_setopt($conn, CURLOPT_URL, $server);
curl_setopt($conn, CURLOPT_RETURNTRANSFER, true);
curl_setopt($conn, CURLOPT_HEADER, false);
curl_setopt($conn, CURLOPT_SSL_VERIFYPEER, false);
curl_setopt($conn, CURLOPT_SSL_VERIFYHOST, 0);
curl_setopt($conn, CURLOPT_POST, true);
curl_setopt($conn, CURLOPT_POSTFIELDS, $postData);
curl_setopt($conn, CURLOPT_CONNECTTIMEOUT,10);
curl_setopt($conn, CURLOPT_TIMEOUT,30);

$result = curl_exec($conn);
curl_close($conn);
Results
On Success
Action info
{ "api": "im_issues", "result": [{ "IssueName": "ADEngine Alert" },{ "TenantName": "GianDev" },{ "Owner": "none" },{ "Severity": "6" },{ "AutoAssign": "Yes" },{ "Category": "none" },{ "Priority": "Low" },{ "Created": "2023-01-01 06:01:14" },{ "Assigned": "Never" },{ "LastUpdate": "2023-01-26 12:21:27" },{ "LastIncident": "2023-01-26 06:00:50" },{ "Closed": "2023-01-26 12:21:27" },{ "Suspended": "Never" },{ "TakeOverSLA": "Exceeded" },{ "OverallSLA": "Exceeded" },{ "Status": "Open" },{ "Status2": "Pending" }] }Action close
{ "api": "im_issues", "result": "Issue closed successfully" }On Errors
{ "api": "im_issues", "result": [{ "error": "api_key missing or invalid" }, { "error": "issue_id missing or invalid" }, { "error": "tenant_id missing or invalid" }, { "error": "action missing or invalid" }] }{ "api": "im_issues", "result": { "error": "Invalid API key" } }{ "api": "im_issues", "result": { "error": "Invalid action specified" } }{ "api": "im_issues", "result": { "error": "unable to load info for the requested Issue" } }{ "api": "im_issues", "result": { "error": "Unable to add close comment. Issue not closed" } }{ "api": "im_issues", "result": { "error": "db_connection failed (<the_connection_error>)" } }Integration
Integrating Third-party Trouble Ticketing System
The IM module can be integrated with third-party Trouble Ticketing systems with easy, through the IM Integration API and a specific configuration.
Open a Ticket on a third-party TT system
The main condition to open a ticket on a 3rd party Trouble Ticketing system is that the 3rd party needs to support ticket opening by email.
To do the magic we need to configure the following:
- Create a TT service SGBox user (from SCM->Users->Users ) whose email is the ticket opening address of the third-party TT system.
- Access the IM configuration, create a new Supervisor TT group and add the previously created service user to this group.
- Create an Automatic Issues Assignment rule that bounds all the classes to the newly created group
That’s it! Each time a new Issue is created, the automatic assignment rule will bound the Issue to the TT group and an email is sent to the group Supervisor opening a new ticket.
Closing an Issue from a third-party TT system
When the third-party TT processing ends, the Issue have to be closed.
Note: Closing the Issue is very important, if we don’t we’ll face with a couple of unwanted side effects:
- No new issues will be opened for that class and the system will continue to queue new Incidents in the old Issue left open.
- The SGBox server will run out of disk space in a short time because the cleanup routines only works on closed issues.
To close an Issue, simply call the API with the action parameter set to close.
Querying an Issue from a third-party
To get detailed information on an Issue, simply call the API with the action parameter set to info.
That’s all folks!


